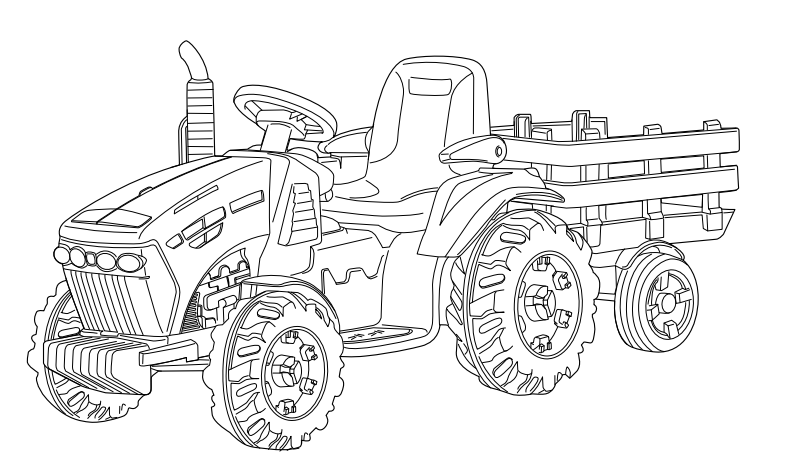
How to Build A Peg Perego John Deere Ground Force Tractor 12V Kids Ride On - Along with a Full Parts List & Instructions
Assembly Guide of How to Build A Peg Perego John Deere Ground Force Tractor 12V Kids Ride On - Along with a Full Parts List & Instructions
If you've got a new Peg Perego John Deere Ground Force 12V Tractorand you want some help building it, this blog post is the place to start!
As well as a full parts list for the Peg Perego John Deere Ground Force at the bottom of this post along with images from the manual and photos of the key steps, we'll go into detail on every element of the assembly of your Ground Force. If you have a second hand Ground Force that you are restoring, then this page is also a great resource for you.
Use the parts list at the bottom of the post to identify any missing parts, then just click the links to order, or click here to get in touch with our friendly team of experts if you need more advice.
So, on with the main event - how exactly do you assemble a Peg Perego John Deere Ground Force 12V? All you'll need to start is around 20 minutes and a Phillips Screwdriver.
Assembling your Kids Ride on Peg Perego Ground Force 12V
Start by separating out the pieces and bags of smaller components, and make sure you have your manual handy. If you have mislaid your manual,scroll to the bottom of this page where you’ll find images of every page along with a full parts list. Put the sticker sheet to one side, as you won’t need this until the very end, and you don’t want to risk creasing it.
This guide follows the same steps as the manual, and we’ll include pictures from the manual along with explanations.
Before we begin, we recommend pre-charging your battery to ensure it remains in optimum condition. This first charge activates the battery, and it can damage the battery cell if this charge is cut short. Charge for a minimum of 8 hours, ideally 12 hours.
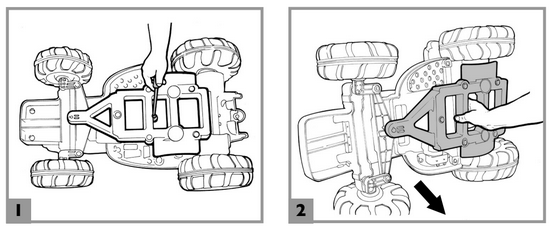
To minimise box size and to provide extra rigidity, your Ground Force has been shipped with the trailer body screwed to the tractor body. The first step in assembling your Ground Force is to unscrew the bottom of the trailer from the bottom of the tractor, as shown in steps 1 and 2 below:
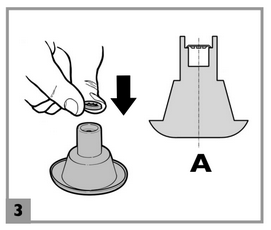
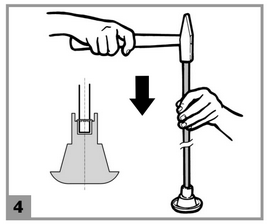
We'll start by assembling the trailer. As shown in steps 3 and 4 below, place on of the supplied self-locking washers into the supplied washer fitting tool. Make sure the tabs on the washer are facing upwards, as shown in detail A. The vehicle comes with two spare washers, so make sure you keep these safe. Now, with a washer inside the tool, take the rear axle and insert it through the washer into the tube end. To ensure the washer is properly placed on the axle, place the tool on the floor and hold the axle vertically, then use a hammer to give it a gentle tap.
Next, slide the following components onto the axle, in this order: large washer, wheel, second wheel, large washer. Four large washers come in the washer pack, so keep your two spares too.
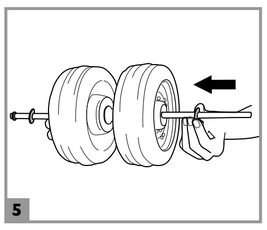
Now take another self-locking washer and place it into the supplied tool as before, ensuring that the tabs are facing upwards. Now place this over the end of the axle that does not already have a self-locking washer fitted. Now, flip it over so that the tool is at the bottom, as shown below, and using your hammer give it a bash until the washer locks into place.
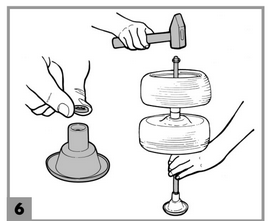
Next, move the wheels to the ends of the axle, and place the trailer base on top of it as shwon below. Press firmly down and the axle will snap into its groove.
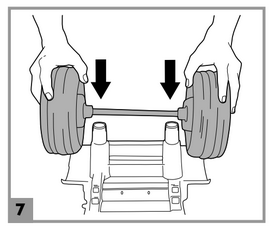
Next, insert the red pin into the trailer as shown below:
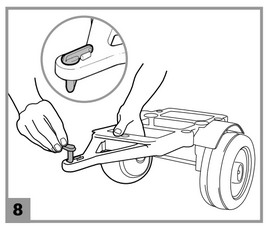
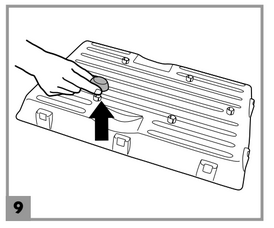
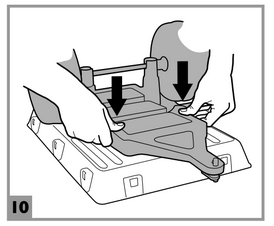
Now remove the five protective caps from the bottom of the trailer bed, and line up the holes with the matching parts on the upper trailer bed. Attach to the upper trailer bed by pressing firmly down, as shown below:
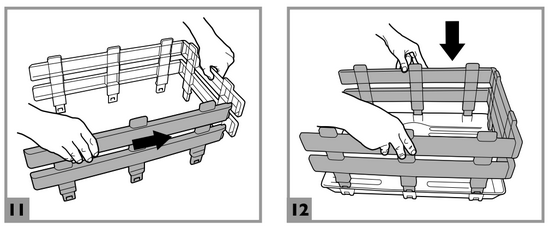
Next, fit the three trailer walls together, ensuring that the wood grain effect is facing outwards. Once you have all three slotted together, these then slot into recesses on the upper truck bed as shown below:
Attach the hubcaps to the trailer wheels - note that you will have six hubcaps, two for the trailer and four for the tractor. Just press these into place to fit.
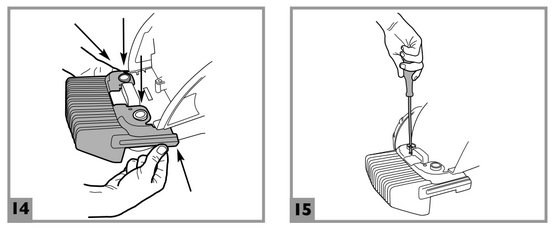
Now we're ready to move on to the tractor itself. The first step is to attach the green counterweight part to front of the black chassis as shown below. The black pegs on the chassis will pass through matching holes in the counterweight. Press the lower sides of the counterweight to latch it into position, and secure with two screws, as shown in the diagram below:
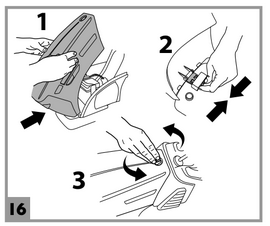
Next, install the hood by inserting the black hinged tongue into the slot on the chassis, and once in position, use a coin to turn the black slotted latch clockwise to lock the hood into place as in the image below:
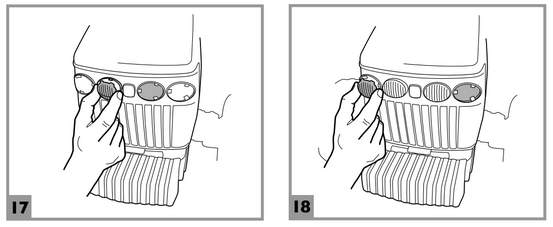
Now we'll fit the headlights. We'll start with the central ones, which are identical, and each have three latches attached designed to fit into the slots in the chassis. Press them into place until the latches click. The outer headlights are not identical, so make sure the latches line up witht he holes before pressing them into place.
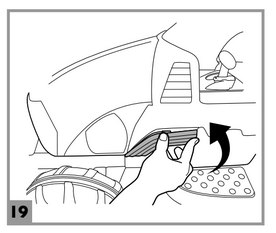
Next, press the two side inserts into the body as shown below:
Now we come to the seat. Start by unscrewing the knobs on the bottom of the seat, then line the seat up witht he two hiles on the seat support, as below:
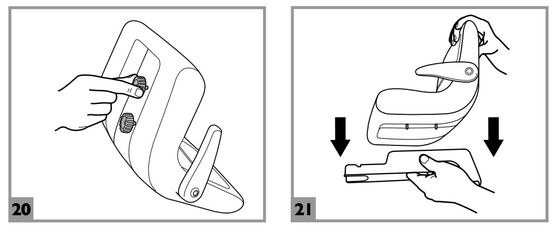
The Ground Force has two seat positions depending on the height of your child. Use the knibs to adjust as shown below:

Finally, insert the green seat supports.
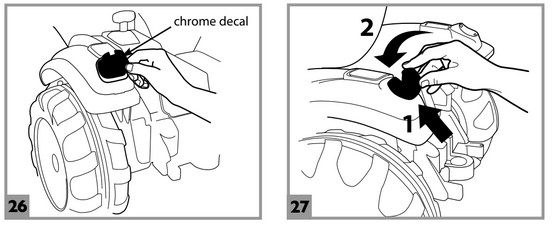
Now we're going to need the sticker sheet - attach the stickers for the rear lights, then place the rear light lenses over them and press to secure. Next install the left and right plastic covers into the C shaped slots in the vehicle's rear fender, as below:
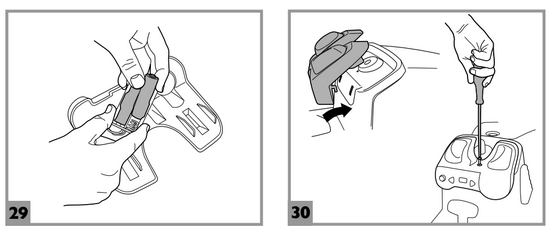
Now it's time for the radio. Start by installing 2 AA batteries into the radio through the access door on the rear side of the radio, then attach the radio to the tractor and secure with a screw as shown below:
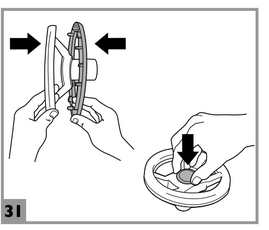
Now we're going to assemble and install the steering wheel. Start by fitting the back and front parts together, ensuring you carefully line them up. Squeeze them together until the plastic latches click, then fit the central steering wheel cap, as shown below:
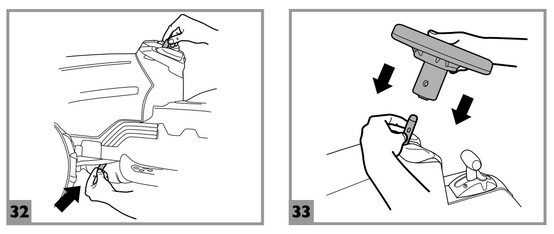
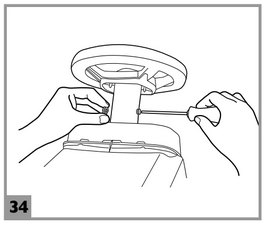
Now pull the steering rod up through the vehicle body as shown in figure 32 below, then fit the steering wheel and fix in place with the bolt as shown in steps 33 and 34.
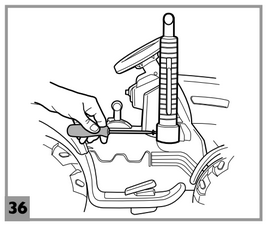
We are now nearly there, with onya few more external parts to fit. First up is the exhaust, which slots inot the recess in part 19, which is then screwed onto the body as shown in step 36:
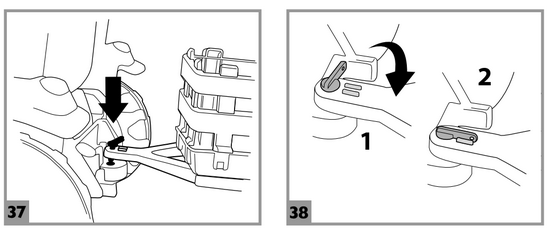
Now we're ready to attach the trailer. Using the trailer hitch pin, link the trailer and the tractor's tow bar, then turn the pin as shown in the diagram below to lock it in position. To remove the trailer, just turn the red hitch pin and lift it free to separate trailer and tractor.
Finally, it's time to fit the battery. You shoukd already have charged your battery for at least 12 hours - we strongly recommend doing this before your first ytest drive to ensure the battery is in top condition. Open the hood using a coin to open the latch as you did when you closed it, and place the battery inside in its bay. Now connect the battery connector to the connector coming from the vehicle, making sure they are snugly clicked together.
Once this is completed, it’s time to place the stickers on the body. If you tear any of your stickers, or would like some extra ones, we sell full Ground Force sticker sheets at this link.
This completes the construction of your Kids Ride on John Deere Ground Force, and now all you need to do is charge your battery and connect it to the vehicle. The first battery charge is a very important step, as it conditions the battery cell, ensuring you get maximum battery life and drivetime. We recommend a 12 hour initial charge with no interruption. Once this is done, simplt slide the battery into the battery bay in the front of the vehicle, and connect the cable to the matching connector inside the battery compartment. Finally, close the compartment and screw it shut.
If you need any further help with assembling your Ground Force, don’t hesitate to get in touch with our friendly team, who will be happy to help. If your Ground Force is a second hand item, we are happy to help, both with guidance and in supplying any missing or worn parts. We stock all parts for the Peg Perego John Deere Ground Force12V, and you can click here to see them all. If you can't find the part on our site, just click here to get in touch and we'll be happy to assist.
12v Ride on John Deere Ground Force Complete Parts List:
The diagram below shows all the 12v Ground Force parts - to find the part ID, just use the table below the diagram.


 British Pounds
