How to Build a Kids John Deere Gator? Assembly Instructions & Parts List
Assembly Guide of How to Build A Peg Perego John Deere Gator HPX 12V Kids Ride On - Along with a Full Parts List & Instructions
If you've got a new Peg Perego John Deere Gator HPX and you want some help building it, this blog post is the place to start!
As well as a full parts list for the Peg Perego Johnn Deere Gator at the bottom of this post along with images from the manual and photos of the key steps, we'll go into detail on every element of the assembly of your Gator. If you have a second hand Gator that you are restoring, then this page is also a great resource for you.
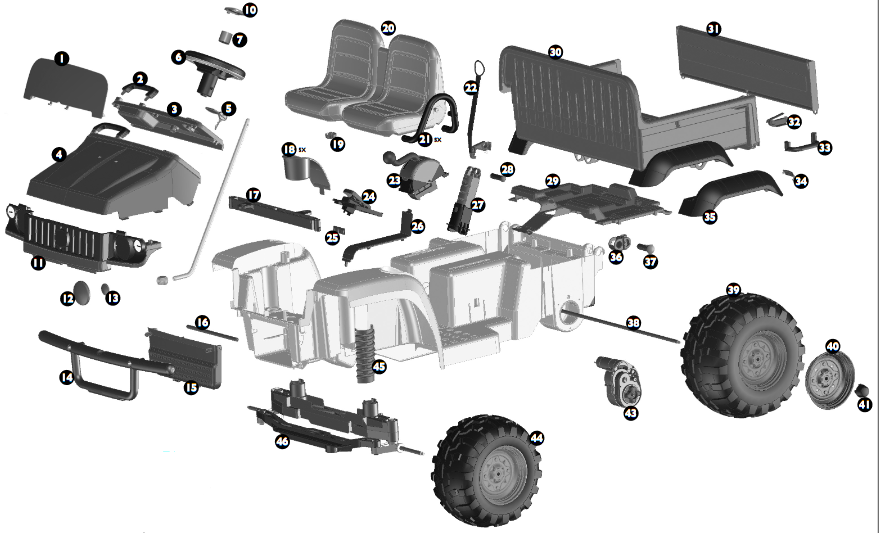
Use the parts list at the bottom of the post to identify any missing parts, then just click the links to order, or click here to get in touch with our friendly team of experts if you need more advice.
So, on with the main event - how exactly do you assemble a Peg Perego John Deere Gator 12V? All you'll need to start is around 20 minutes and a Phillips Screwdriver.
Assembling your Kids Ride on Peg Perego Gator 12V
Start by separating out the pieces and bags of smaller components, and make sure you have your manual handy. If you have mislaid your manual, click here to download a new copy. Put the sticker sheet to one side, as you won’t need this until the very end, and you don’t want to risk creasing it.
This guide follows the same steps as the manual, and we’ll include pictures from the manual along with explanations.
The very first step is to fit the windscreen. Make sure the two protruding triangular braces are facing the rear of the vehicle, as shown in step 1 in the image below, then once it is in position, use the two screws from your screw pack to screw it securely into place as in step 2 below.

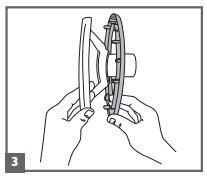
Once the windscreen is in position and has been screwed securely into place, it’s time for the steering wheel. As shown in step 3 below, start by joining the yellow steering wheel backing to the black main body. Be careful not to bend or snap the plastic catches in the yellow backing, making sure you line them up with the corresponding holes in the black main steering wheel body.
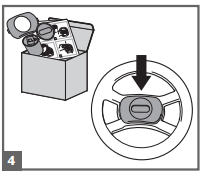
Next, it’s time to assemble and fit the horn. The horn module is usually packed in a small white box stowed under the dashboard. Start by removing the small white battery protector tab from the horn cylinder. This covers the battery terminal and ensures the battery reaches you fresh and ready for plenty of beeping. Place the horn into the circular well in the steering wheel, then fix it into place using the oval horn cover, which snaps into the wheel as shown in figure 4 below:
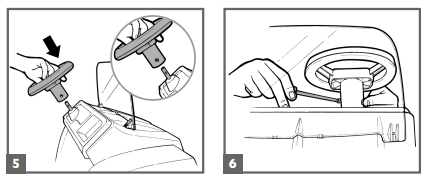
Now that the horn is installed, you’re ready to fir the steering wheel into the vehicle’s dashboard. Slot it into the collar in the dashboard, making sure you push it onto the steering rod. If you look at the base of the wheel from the right hand side, you will see that there is a hole that should now be lining up with a corresponding hole in the steering rod. Insert the bolt from your screw pack and tighten this with your screwdriver until the steering wheel is snug and secure, as shown below
The manual advises to place the key in the ignition at this point, however if you wish to leave this step until the end when you are ready to power it up, it’s safe to do so.
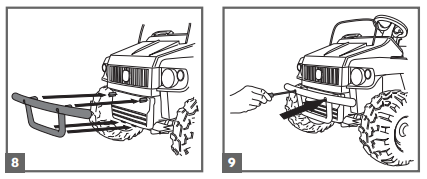
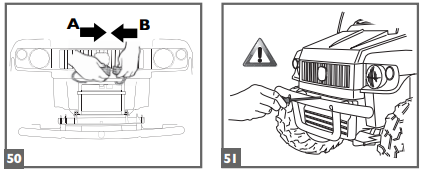
The next part to fit to the Gator is the front bumper bar. This uses four screws to attach to the battery door located under the vehicle’s front grille. Make sure the screws are done up tightly here, as the bumper protects the vehicle from impacts.
Next, fit the small handles to the sides of the dump bed. This is the step that we most often hear causing confusion, so we’ll go into extra detail here. The most confusing part if this step is locating the screw required to fit the handles. See the image below:
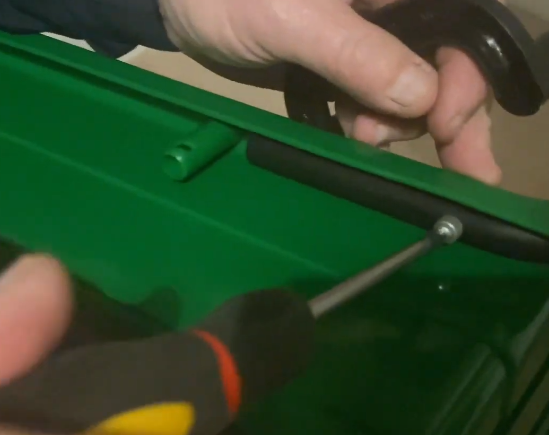
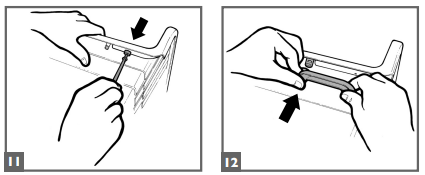
This screw needs to be removed so that you can then use it to fit the handle. Start by removing the screw, then fit the handle into place ans screw the screw back in to fix it, as shown in the images below:
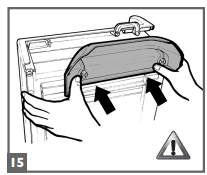
Next, it’s time to fit the rear hubcaps. You’ll notice that the black hubcaps have a smooth surface at one end and a recess at the other. The recess is for the indicator lenses, which we recommend fitting now, to make the hub caps easier to install, however you can fit the hubcap first if you wish, as shown in the image from the manual below:
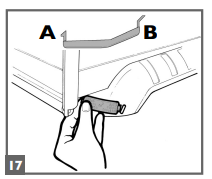
The hubcaps can now be fitted to the sides of the rear truck bed. Simply line them up with the holes in the side of the truck bed as shown in the diagram below, then press until they snap into place:
Now it’s time to install the truck bed. Set it into place on the rear body as shown in the image below:

The important part here is shown in the zoomed circle in the image above – ensure that the circular holes in the Gator body line up with the hole in the trailer. Now use the hitch pin to fix the trailer bed to the vehicle, as shown below:
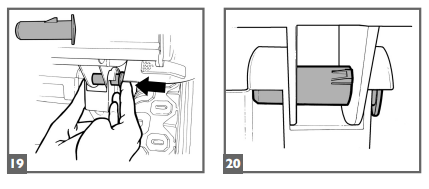
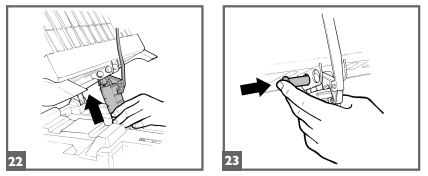
Note that you will be removing these hitch pins later, and for now they are only holding the trailer in place. Next it’s time for another slightly confusing step, so we’ll provide extra detail here. It’s time to install the red truck bed release handle. Start by lining this up with the catch located where the front of the truck bed meets the body of the Gator, as shown in the image below:
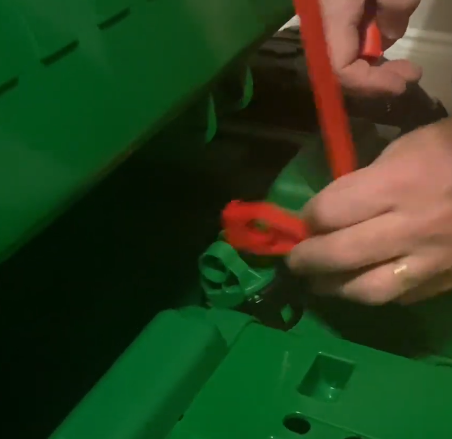
Now use the small red release pin to pin it in place, as below:
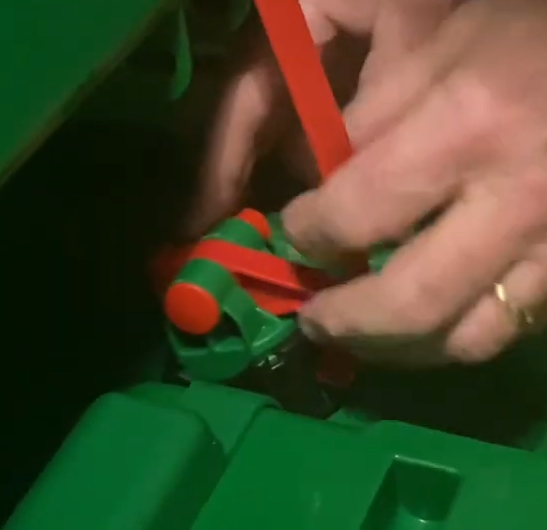
Now, pull up the handle to extend the dump bed support cylinder, which you’ll see extend up from the vehicle body. Once it’s at full extension, pop the red pin back out, then line up the hole you just removed it from with the corresponding hole on the base of the truck bed. You can now put the pin back in, making sure it passes through the support cylinder, the red handle, and the receiver hole in the bottom of the trunk bed, as shown below:
Now that the trailer release catch is installed, we’re going to return to the hitch pins that you fitted to the trailer hinges earlier on. These now need to be removed, and you need to insert part 36 from the parts list into each hinge, as shown in the image below:

Start as in steps 40 and 41 by placing part 36 in position, then fitting the hitch pin carefully into the outside edge, leaving room for the receiver part of the hinge in the bottom of the bed. Lower the bed as in step 42, then push the pins in all the way.
Once this is completed, it’s time to place the stickers on the body. If you tear any of your stickers, or would like some extra ones, we sell full Gator sticker sheets at this link.
This completes the construction of your Kids Ride on John Deere Gator, and now all you need to do is charge your battery and connect it to the vehicle. The first battery charge is a very important step, as it conditions the battery cell, ensuring you get maximum battery life and drivetime. We recommend a 12 hour initial charge with no interruption. Once this is done, simplt slide the battery into the battery bay in the front of the vehicle, and connect the cable to the matching connector inside the battery compartment. Finally, close the compartment and screw it shut.
The Gator comes complete with a simple parental speed limiter system which allows you to lock off the top gear. To allow use of the top gear, simply undo the screw in the gear selector and move it into one of the two positions, as below:
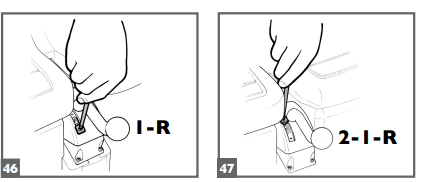
The position shown in step 46 allows only first gear and reverse, while the position in 47 allows reverse, low and high gears to be used.
If you need any further help with assembling your Gator, don’t hesitate to get in touch with our friendly team, who will be happy to help. If your Gator is a second hand item, we are happy to help, both with guidance and in supplying any missing or worn parts. We stock all parts for the Peg Perego John Deere Gator HPX 12V, and you can click here to see them all. If you can't find the part on our site, just click here to get in touch and we'll be happy to assist.
12v Ride on John Deere Gator Complete Parts List:
The diagram below shows all the 12v Gator parts - to find the part ID, just use the table below the diagram.

| Part Number From Manual | Part ID |
| 1 | |
| 2 | |
| 3 | |
| 4 | |
| 5 | |
| 6 | |
| 7 | |
| 8 | |
| 9 | |
| 10 | |
| 11 | ASG10218NVB - Gator Front Grille |
| 12 | |
| 13 | |
| 14 | |
| 15 | |
| 16 | |
| 17 | |
| 18 | |
| 18b | |
| 19 | |
| 20 | |
| 21 | |
| 21b | |
| 22 | |
| 23 | |
| 24 | |
| 25 | |
| 26 | |
| 27 | |
| 28 | |
| 29 | |
| 30 | |
| 31 | |
| 32 | |
| 32b | SPST8107SR - As above we sell in pairs |
| 33 | |
| 34 | |
| 35 | |
| 36 | |
| 37 | |
| 38 | |
| 39 | SARP9023DNY - Replacement Rear Wheel Set [left & right] |
| 39b | |
| 40 | |
| 41 | |
| 42 | |
| 43 | |
| 44 | |
| 44b | |
| 45 | |
| 46 | |

 British Pounds
